Recently I have switched from a Behringer X32 mixer to the smaller XR18 as I am a big fan of the small stage box type form factor and I can usually get by with using 16 channels.
One thing that I found missing compared to the X32 is the ability to record 2 channels directly to a usb stick. Therefore I thought about possible ways to work around this missing feature. In the end I settled on a Raspberry Pi 3 which is running the audio player distribution moode audio and is connected via USB to the XR18. With a small bash script it is possible to create an automatic recorder that will record mp3 files whenever audio is playing on the XR18.
Let’s start with some pointers on setting up the XR18 for moode audio and recording. Make sure to send the Main LR bus on USB1 and USB2. So go to In/Out, select USB Sends and select Main LR for USB1 and USB2. You can choose any mode you like but I prefer Pre EQ. My Main LR EQ is always trimmed for the room. So I don’t want to have this EQ on the recording. The Pre EQ setting will achieve just that and has the added benefit that changes to the master volume will also not be reflected on the recording. The screen will look like this:

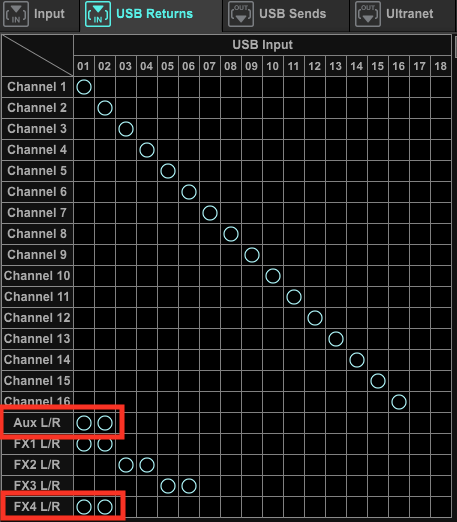
USB return channels 1 and 2 also need to be mapped to XR18 channels. I usually map them to Aux L/R and FX4 L/R. I only need 3 send FX, so my FX4 is configured as an insert effect and therefore does not need return channels. By mapping the USB return to FX4 L/R, I free up the Aux Stereo Channel for other uses. This is what my USB Returns mapping looks like:
In moode audio you just need to enable USB audio output and you will be able to play audio through your XR18 without any other configuration changes.
Now we are all set for working on the recording side. The following steps can be done on a plain Raspbian distribution or on moode audio or most probably any other Debian based Rapsberry Pi distribution.
First we need to install required software packages. So log in to your Raspberry via SSH and run this command:
sudo apt-get install sox libsox-fmt-mp3Now create a new shell script named recorder.sh in /home/pi with the following contents:
#!/bin/bash

while [ 1 ]
do
  FILENAME=/media/FILES/XR18/$(date +"%Y%m%d_%H%M").mp3
  AUDIODEV="hw:X18XR18,0" rec -q --buffer 262144 -c 2 -C 256 $FILENAME silence 1 0.1 2% 1 3:00 2% gain -9
  [ $? -eq 0 ] || exit $?

  # Remove file if nothing has been recorded
  FILESIZE=$(du -sb $FILENAME | cut -f 1)
  if [ $SIZE -lt 2048 ]; then
    rm $FILENAME
  fi

  sleep 30
done
Please change the path in FILENAME to the location where you want the recordings to be stored. I am using a USB stick named FILES that is automatically mounted during bootup by moode audio under the path /media/FILES. On this stick the recordings should be stored in the directory XR18.
The XR18 will identify itself to the operating system with the string X18XR18. If you are using another device, you need to identify the string that the other device reports by running aplay -l. The X32 for example can be accessed by the name XUSB.
The recording is done in an endless loop with the current timestamp as the filename by running the rec utility. It is configured to start recording once a signal with at least 2% volume is present and it will automatically stop 3 minutes after the signal level has dropped below 2%. Additionally the gain is reduced by 9dB to prevent possible clipping when running the XR18 output hot. Recording format is mp3 with a bitrate of 256kBit.
Should the rec utility exit with an error code (for example if the XR18 is not found), then the script will terminate. In all other cases it will delete the created file if it has not recorded anything (detected by checking the file size), sleep for 30 seconds and then start the recording again.
Make the script executable by running:
chmod a+x recorder.shNow you only need to run this script automatically after booting up the Raspberry PI. Do this by appending the following line to the file /etc/rc.local before exit 0:
/home/pi/recorder.sh &From now on, you just need to connect your Raspberry Pi via USB to the XR18 and it will both serve as an audio player and a recorder that will start recording whenever a signal is detected on the Main LR output of the XR18.
Update March, 5: Multitrack Recording
It is also possible to use the rec utility for multitrack recording. It is possible to record all 18 inputs of the XR18 in a single multichannel WAV file. But there are some caveats you need to be aware of:
- Silence detection does not work in multitrack mode. So you need a way to start and stop the recording manually.
- Multitrack files tend to get very big, so your recording target (USB stick) needs to be formatted with a file system, that supports large files. I had no problems with exFAT formatted USB sticks.
- Your USB stick should be able to consistently write at least 2MB per second. I had some good results with a SanDisk Ultra Fit 64GB USB3 stick.
Here is the command line to record 18 tracks 24bit WAV files:
AUDIODEV="hw:X18XR18,0" rec -q --buffer 262144 -c 18 -b 24 /path/to/file.wavUpdate May, 12: 2-Track WAV Recording
I have now switched to recording wav files as my USB sticks have more than enough free space so that I don’t need compression during recording. The rec parameters look like this:
AUDIODEV="hw:X18XR18,0" rec -q --buffer 1048576 -b 16 -c 2 ${FILENAME} silence 1 0.1 0.1% 1 3:00 0.1%Update June, 2: Fixing soundcard order
With the latest Moode release 4.1 the XR18 sometimes is detected as device 0 and sometimes as device 1. This leads to problems when trying to use Moode. The sound will not play. You can see the order your cards have been initializes with:
pi@moode:~ cat /proc/asound/cards
 0 [ALSA           ]: bcm2835_alsa - bcm2835 ALSA
                      bcm2835 ALSA
 1 [X18XR18        ]: USB-Audio - X18/XR18
                      BEHRINGER X18/XR18 at usb-3f980000.usb-1.3, high speed
Moode expects the USB device to be device 1. To make sure the XR18 is device 1 you need to create a file /etc/modprobe.d/alsa.conf with the following contents:
options snd-usb-audio index=1Besides the XR18, I have also connected a X-TOUCH-MINI controller which is also recognized as an USB audio device, so I need to make sure the XR18 is device 1 and the X-TOUCH device 2. This is done with the following line:
options snd-usb-audio index=1,2 vid=0x1397,0x1397 pid=0x00d4,0x00b3
Leave a Reply